//THIS CODE IS WRITTEN BY ASHISH MAURYA (TECHNOLAB CREATION),MODIFY AND USE IT TO UR PROJECT
// Variable to store text message
String textMessage;

// Create a variable to store LIGHTS state
String light1State = "LOW";
String light2State = "LOW";
String light3State = "LOW";
String light4State = "LOW";
String light5State = "LOW";
String light6State = "LOW";
String light7State = "LOW";
String light8State = "LOW";


// LEDS connected to pin 3,4,5,6,7,8,9,10
const int light1 = 10;
const int light2 = 9;
const int light3 = 8;
const int light4 = 7;
const int light5 = 6;
const int light6 = 5;
const int light7 = 4;
const int light8 = 3;


void setup() {

  // Set lights as OUTPUT
  pinMode(light1, OUTPUT);
  pinMode(light2, OUTPUT);
  pinMode(light3, OUTPUT);
  pinMode(light4, OUTPUT);
  pinMode(light5, OUTPUT);
  pinMode(light6, OUTPUT);
  pinMode(light7, OUTPUT);
  pinMode(light8, OUTPUT);


  // By default the leds is on
  digitalWrite(light1, LOW);
  digitalWrite(light2, LOW);
  digitalWrite(light3, LOW);
  digitalWrite(light4, LOW);
  digitalWrite(light5, LOW);
  digitalWrite(light6, LOW);
  digitalWrite(light7, LOW);
  digitalWrite(light8, LOW);


  // Initializing serial commmunication
  Serial.begin(19200);

  // Give time to your GSM shield log on to network
  delay(20000);

  // AT command to set SIM900 to SMS mode
  Serial.print("AT+CMGF=1\r");
  delay(100);
  // Set module to send SMS data to serial out upon receipt
  Serial.print("AT+CNMI=2,2,0,0,0\r");
  delay(100);
}

void loop(){
  if(Serial.available()>0){
    textMessage = Serial.readString();
    textMessage.toUpperCase();
    delay(10);
  }
  if(textMessage.indexOf("LIGHT1ON")>=0){
    // Turn on red led and save current state
    digitalWrite(light1, HIGH);
    light1State = "on";
    textMessage = "";
  }
  if(textMessage.indexOf("LIGHT1OFF")>=0){
    // Turn off red led and save current state
    digitalWrite(light1, LOW);
    light1State = "off";
    textMessage = "";
  }
   if(textMessage.indexOf("LIGHT2ON")>=0){
    // Turn on blueled and save current state
    digitalWrite(light2, HIGH);
    light2State = "on";
    textMessage = "";
  }
  if(textMessage.indexOf("LIGHT2OFF")>=0){
    // Turn off blueled and save current state
    digitalWrite(light2, LOW);
    light2State = "off";
    textMessage = "";
  }
   if(textMessage.indexOf("LIGHT3ON")>=0){
    // Turn on green led and save current state
    digitalWrite(light3, HIGH);
    light3State = "on";
    textMessage = "";
  }
  if(textMessage.indexOf("LIGHT3OFF")>=0){
    // Turn off grrenled and save current state
    digitalWrite(light3, LOW);
    light3State = "off";
    textMessage = "";
  }
   if(textMessage.indexOf("LIGHT4ON")>=0){
    // Turn on red led and save current state
    digitalWrite(light4, HIGH);
    light4State = "on";
    textMessage = "";
  }
  if(textMessage.indexOf("LIGHT4OFF")>=0){
    // Turn off red led and save current state
    digitalWrite(light4, LOW);
    light4State = "off";
    textMessage = "";
  }

   if(textMessage.indexOf("LIGHT5ON")>=0){
    // Turn on red led and save current state
    digitalWrite(light5, HIGH);
    light5State = "on";
    textMessage = "";
  }
  if(textMessage.indexOf("LIGHT5OFF")>=0){
    // Turn off red led and save current state
    digitalWrite(light5, LOW);
    light5State = "off";
    textMessage = "";
  }

   if(textMessage.indexOf("LIGHT6ON")>=0){
    // Turn on red led and save current state
    digitalWrite(light6, HIGH);
    light6State = "on";
    textMessage = "";
  }
  if(textMessage.indexOf("LIGHT6OFF")>=0){
    // Turn off red led and save current state
    digitalWrite(light6, LOW);
   light6State = "off";
    textMessage = "";
  }

   if(textMessage.indexOf("LIGHT7ON")>=0){
    // Turn on red led and save current state
    digitalWrite(light7, HIGH);
    light7State = "on";
    textMessage = "";
  }
  if(textMessage.indexOf("LIGHT7OFF")>=0){
    // Turn off red led and save current state
    digitalWrite(light7, LOW);
    light7State = "off";
    textMessage = "";
  }

   if(textMessage.indexOf("LIGHT8ON")>=0){
    // Turn on red led and save current state
    digitalWrite(light8, HIGH);
    light8State = "on";
    textMessage = "";
  }
  if(textMessage.indexOf("LIGHT8OFF")>=0){
    // Turn off red led and save current state
    digitalWrite(light8, LOW);
    light8State = "off";
    textMessage = "";
  }
  ///////////////////////////////////////////////////////////////
  if(textMessage.indexOf("LIGHT1STATE")>=0){
    String message = "light1 is " + light1State;
    sendSMS(message);
    textMessage = "";
  }
  if(textMessage.indexOf("LIGHT2STATE")>=0){
    String message = "light2 is " + light2State;
    sendSMS(message);
    textMessage = "";
  }
  if(textMessage.indexOf("LIGHT3STATE")>=0){
    String message = "light3 is " + light3State;
    sendSMS(message);
    textMessage = "";
  }
    if(textMessage.indexOf("LIGHT4STATE")>=0){
    String message = "light4 is " + light4State;
    sendSMS(message);
    textMessage = "";
  }
    if(textMessage.indexOf("LIGHT5STATE")>=0){
    String message = "light5 is " + light5State;
    sendSMS(message);
    textMessage = "";
  }
    if(textMessage.indexOf("LIGHT6STATE")>=0){
    String message = "light6 is " + light6State;
    sendSMS(message);
    textMessage = "";
  }
    if(textMessage.indexOf("LIGHT7STATE")>=0){
    String message = "light7 is " + light7State;
    sendSMS(message);
    textMessage = "";
  }
    if(textMessage.indexOf("LIGHT8STATE")>=0){
    String message = "light8 is " + light8State;
    sendSMS(message);
    textMessage = "";
  }
}

// Function that sends SMS
void sendSMS(String message){
  // AT command to set SIM900 to SMS mode
  Serial.print("AT+CMGF=1\r");
  delay(100);

  // REPLACE THE X's WITH THE RECIPIENT'S MOBILE NUMBER
  // USE INTERNATIONAL FORMAT CODE FOR MOBILE NUMBERS
   Serial.println("AT + CMGS = \"+91XXXXXXXXXX\"");
  delay(100);
  // Send the SMS
  Serial.println(message);
  delay(100);

  // End AT command with a ^Z, ASCII code 26
  Serial.println((char)26);
  delay(100);
  Serial.println();
  // Give module time to send SMS
  delay(5000);
}


Sir,
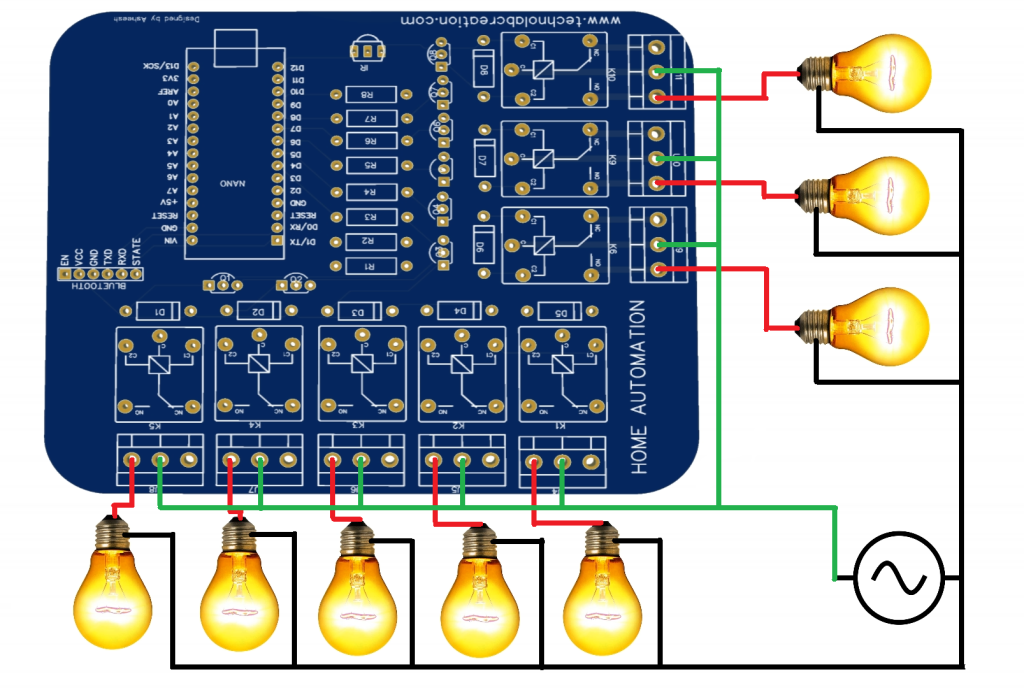
I want to make project for study purpose in college ,so i want to do this project for submission in college please give me the circuit diagram for this project, so i think that you support for my submission project for study
Thank you sir.
Everything is available in the article.
Sir hear we can give signal from our mobile like on and off but I need signal from gsm like if light is on or off example if light is off or on I need that msg from gsm i,e light is on
yes you can make it. just by little bit modification in the code, you can checkout my video on this concept on my channel.
Plz provide solution sir it could be helpful for me a lot thankyou
There is clearly a bundle to realize about this. I think you made some good points in features also. Teddy Hyams
You have a solid capability for creating unique content. I find that I am in agreement with your thoughts. Thanks for writing this. Aaron Rolando
I am truly happy to glance at this web site posts which includes plenty of helpful information, thanks for providing these kinds of information. Barrett Acheson
Pretty! This was an incredibly wonderful article. Thank you for supplying this info. Julian Bickman