#include <WiFi.h>
#include <WiFiClientSecure.h>
#include <UniversalTelegramBot.h> // Universal Telegram Bot Library written by Brian Lough: https://github.com/witnessmenow/Universal-Arduino-Telegram-Bot
#include <ArduinoJson.h>
// Replace with your network credentials
const char* ssid = "xxxxxxxx";
const char* password = "xxxxxxxxxx";
// Initialize Telegram BOT
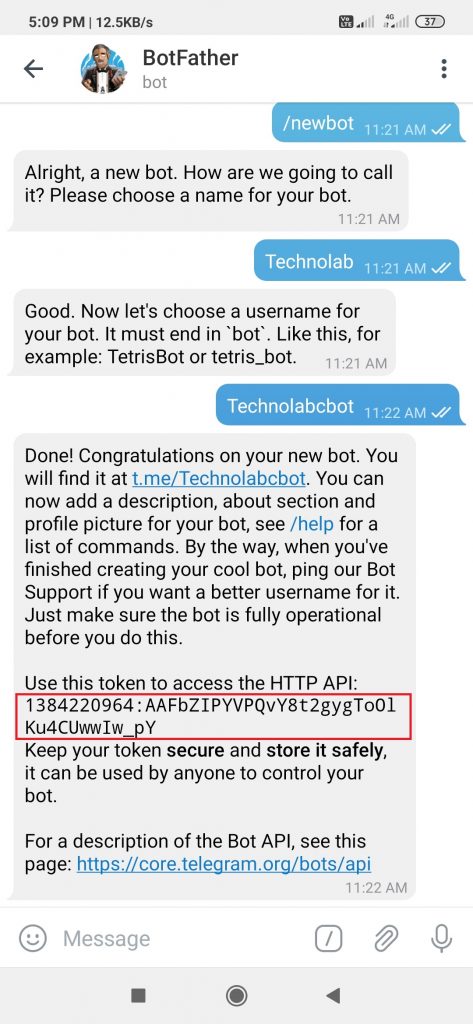
#define BOTtoken "xxxxxxxxxxxxxxxxxxxxx" // your Bot Token (Get from Botfather)
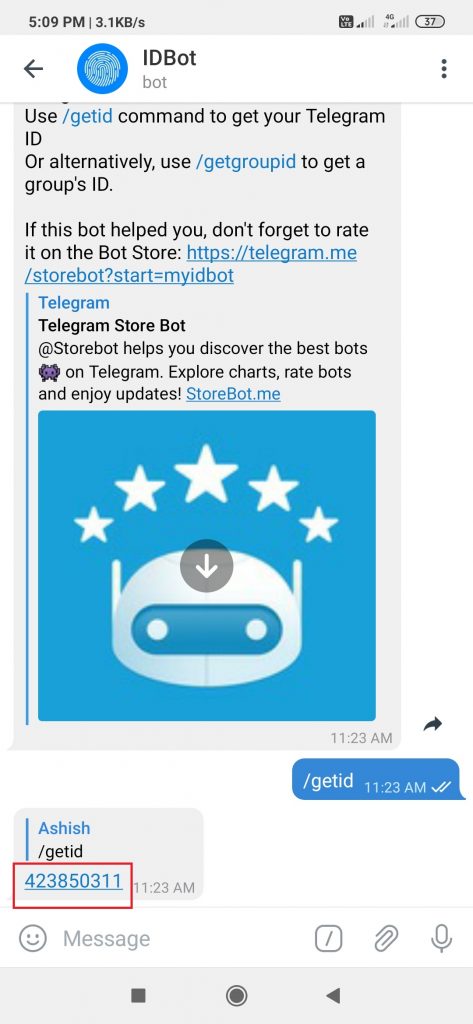
// Use @myidbot to find out the chat ID of an individual or a group
// Also note that you need to click "start" on a bot before it can
// message you
#define CHAT_ID "xxxxxxxxx"
WiFiClientSecure client;
UniversalTelegramBot bot(BOTtoken, client);
// Checks for new messages every 1 second.
int botRequestDelay = 1000;
unsigned long lastTimeBotRan;
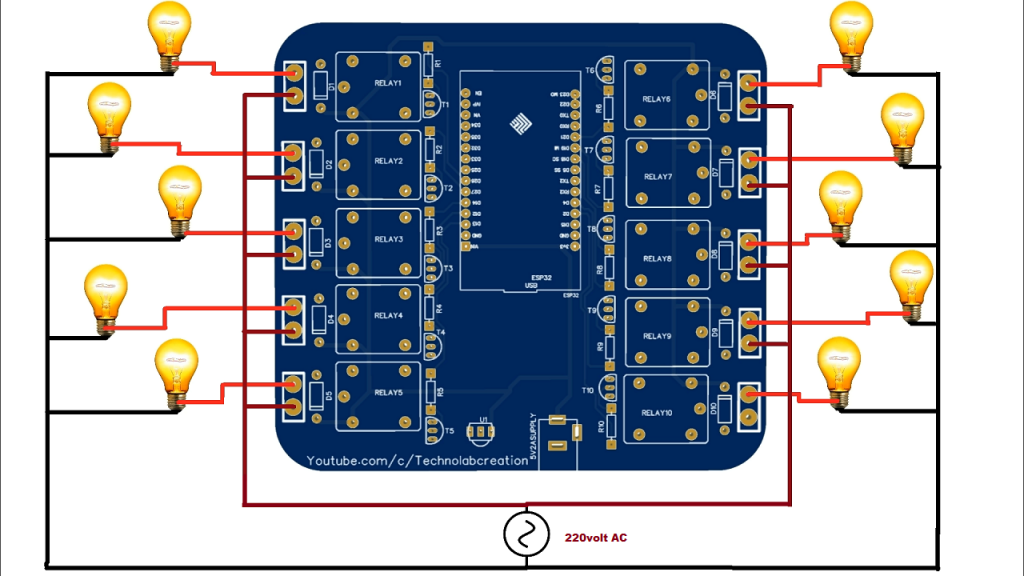
const int Relay1 = 26;
const int Relay2 = 27;
const int Relay3 = 14;
const int Relay4 = 12;
const int Relay5 = 13;
String Relay1State = "HIGH";
String Relay2State = "HIGH";
String Relay3State = "HIGH";
String Relay4State = "HIGH";
String Relay5State = "HIGH";
// Handle what happens when you receive new messages
void handleNewMessages(int numNewMessages) {
Serial.println("handleNewMessages");
Serial.println(String(numNewMessages));
for (int i=0; i<numNewMessages; i++) {
// Chat id of the requester
String chat_id = String(bot.messages[i].chat_id);
if (chat_id != CHAT_ID){
bot.sendMessage(chat_id, "Unauthorized user", "");
continue;
}
// Print the received message
String text = bot.messages[i].text;
Serial.println(text);
String from_name = bot.messages[i].from_name;
text.toUpperCase();
delay(10);
if (text == "START") {
String welcome = "Welcome, " + from_name + ".\n";
welcome += "Use the following commands to control your outputs.\n\n";
welcome += "light1on to turn light1 ON \n";
welcome += "light1off to turn light1 OFF \n";
welcome += "light2on to turn light2 ON \n";
welcome += "light2off to turn light2 OFF \n";
welcome += "light3on to turn light3 ON \n";
welcome += "light3off to turn light3 OFF \n";
welcome += "light4on to turn light4 ON \n";
welcome += "light4off to turn light4 OFF \n";
welcome += "light5on to turn light5 ON \n";
welcome += "light5off to turn light5 OFF \n";
// welcome += "/state to request current GPIO state \n";
bot.sendMessage(chat_id, welcome, "");
}
if (text == "LIGHT1ON") {
bot.sendMessage(chat_id, "Light1 state set to ON", "");
Relay1State = "ON";
digitalWrite(Relay1,HIGH);
}
if (text == "LIGHT1OFF") {
bot.sendMessage(chat_id, "Light1 state set to OFF", "");
Relay1State = "OFF";
digitalWrite(Relay1,LOW);
}
if (text == "LIGHT2ON") {
bot.sendMessage(chat_id, "Light2 state set to ON", "");
Relay2State = "ON";
digitalWrite(Relay2,HIGH);
}
if (text == "LIGHT2OFF") {
bot.sendMessage(chat_id, "Light2 state set to OFF", "");
Relay2State ="OFF";
digitalWrite(Relay2,LOW);
}
if (text == "LIGHT3ON") {
bot.sendMessage(chat_id, "Light3 state set to ON", "");
Relay3State = "ON";
digitalWrite(Relay3,HIGH);
}
if (text == "LIGHT3OFF") {
bot.sendMessage(chat_id, "Light3 state set to OFF", "");
Relay3State = "OFF";
digitalWrite(Relay3,LOW);
}
if (text == "LIGHT4ON") {
bot.sendMessage(chat_id, "Light4 state set to ON", "");
Relay4State = "ON";
digitalWrite(Relay4,HIGH);
}
if (text == "LIGHT4OFF") {
bot.sendMessage(chat_id, "Light4 state set to OFF", "");
Relay4State = "OFF";
digitalWrite(Relay4,LOW);
}
if (text == "LIGHT5ON") {
bot.sendMessage(chat_id, "Light5 state set to ON", "");
Relay5State = "ON";
digitalWrite(Relay5,HIGH);
}
if (text == "LIGHT5OFF") {
bot.sendMessage(chat_id, "Light5 state set to OFF", "");
Relay5State ="OFF";
digitalWrite(Relay5,LOW);
}
///////////////////////////////////////////////////////////////////////////////////// ////////////////////////////////////
if (text == "LIGHT1STATE") {
bot.sendMessage(chat_id, "Light1 is " + Relay1State + "");
}
if (text == "LIGHT2STATE") {
bot.sendMessage(chat_id, "Light2 is " + Relay2State + "");
}
if (text == "LIGHT3STATE") {
bot.sendMessage(chat_id, "Light3 is " + Relay3State + "");
}
if (text == "LIGHT4STATE") {
bot.sendMessage(chat_id, "Light4 is " + Relay4State + "");
}
if (text == "LIGHT5STATE") {
bot.sendMessage(chat_id, "Light5 is " + Relay5State + "");
}
///////////////////////////////////////////////////////////////////////////////////////////////////////////////////////////////
}
}
void setup() {
Serial.begin(115200);
#ifdef ESP8266
client.setInsecure();
#endif
pinMode(Relay1, OUTPUT);
pinMode(Relay2, OUTPUT);
pinMode(Relay3, OUTPUT);
pinMode(Relay4, OUTPUT);
pinMode(Relay5, OUTPUT);
digitalWrite(Relay1, LOW);
digitalWrite(Relay2, LOW);
digitalWrite(Relay3, LOW);
digitalWrite(Relay4, LOW);
digitalWrite(Relay5, LOW);
// Connect to Wi-Fi
WiFi.mode(WIFI_STA);
WiFi.begin(ssid, password);
while (WiFi.status() != WL_CONNECTED) {
delay(1000);
Serial.println("Connecting to WiFi..");
}
// Print ESP32 Local IP Address
Serial.println(WiFi.localIP());
}
void loop() {
if (millis() > lastTimeBotRan + botRequestDelay) {
int numNewMessages = bot.getUpdates(bot.last_message_received + 1);
while(numNewMessages) {
Serial.println("got response");
handleNewMessages(numNewMessages);
numNewMessages = bot.getUpdates(bot.last_message_received + 1);
}
lastTimeBotRan = millis();
}
}


: A Transformative Leap into the Future")

