
")
Heartbeat Sensor using Arduino (Heart Rate Monitor)
In this post we are going to make a Heart Beat Detection and Monitoring System using Arduino that will detect the heart beat using the Pulse Sensor and will display the reading in 16×2 LCD in BPM (Beats Per Minute).

The Heartbeat Sensor
Heartbeat Sensor is an electronic device that is used to measure the heart rate i.e. speed of the heartbeat. Monitoring body temperature, heart rate and blood pressure are the basic things that we do in order to keep us healthy.
Heart Rate can be monitored in two ways: one way is to manually check the pulse either at wrists or neck and the other way is to use a Heartbeat Sensor
The principle behind the working of the Heartbeat Sensor is Photoplethysmograph. According to this principle, the changes in the volume of blood in an organ is measured by the changes in the intensity of the light passing through that organ.

Working of Heartbeat Sensor
A simple Heartbeat Sensor consists of a sensor and a control circuit. The sensor part of the Heartbeat Sensor consists of an IR LED and a Photo Diode placed in a clip.
The sensor has a clip to insert the finger and has three pins coming out of it for connecting VCC, GND and the Data.

Parts needed:
So, for this example, you’ll need:
- Arduino UNO x 1
- 16 x 2 LCD Display x 1
- 10KΩ Potentiometer
- Heartbeat Sensor Module (finger based)
- Bread Board.
- Jumper Wires.
Circuit Design of Interfacing Heartbeat Sensor with Arduino
First we connect heartbeat sensor with arduino and display readings in the serial monitor.then we connect a 16×2 LCD display to show the readings.
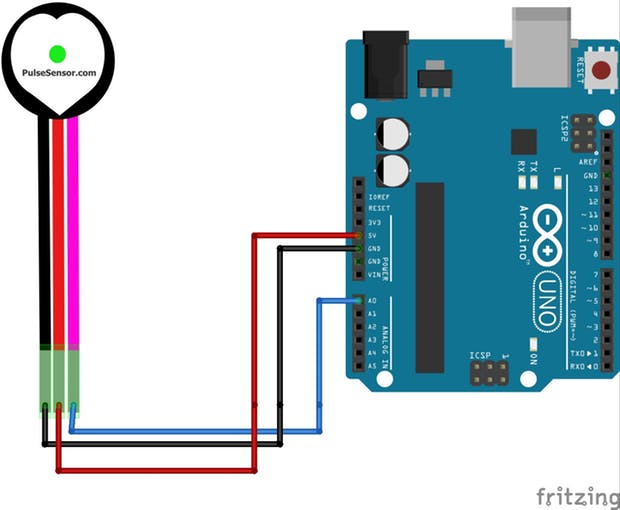
Pin Wiring
Wiring your sensor to the Arduino is pretty simple:
| Pin | Wiring to Arduino Uno |
| A0 | Analog Pins |
| GND | GND |
| VCC | 5V |
Schematics
Follow these schematics to complete the project:
Code
Upload the following sketch to your Arduino board:
//code copied from arduino.cc
int pulsePin = A0;                 // Pulse Sensor purple wire connected to analog pin A0
int blinkPin = 13;                // pin to blink led at each beat

// Volatile Variables, used in the interrupt service routine!
volatile int BPM;                   // int that holds raw Analog in 0. updated every 2mS
volatile int Signal;                // holds the incoming raw data
volatile int IBI = 600;             // int that holds the time interval between beats! Must be seeded!
volatile boolean Pulse = false;     // "True" when User's live heartbeat is detected. "False" when not a "live beat".
volatile boolean QS = false;        // becomes true when Arduoino finds a beat.

static boolean serialVisual = true;   // Set to 'false' by Default.  Re-set to 'true' to see Arduino Serial Monitor ASCII Visual Pulse

volatile int rate[10];                      // array to hold last ten IBI values
volatile unsigned long sampleCounter = 0;          // used to determine pulse timing
volatile unsigned long lastBeatTime = 0;           // used to find IBI
volatile int P = 512;                      // used to find peak in pulse wave, seeded
volatile int T = 512;                     // used to find trough in pulse wave, seeded
volatile int thresh = 525;                // used to find instant moment of heart beat, seeded
volatile int amp = 100;                   // used to hold amplitude of pulse waveform, seeded
volatile boolean firstBeat = true;        // used to seed rate array so we startup with reasonable BPM
volatile boolean secondBeat = false;      // used to seed rate array so we startup with reasonable BPM

void setup()
{
  pinMode(blinkPin,OUTPUT);         // pin that will blink to your heartbeat!
  Serial.begin(115200);             // we agree to talk fast!
  interruptSetup();                 // sets up to read Pulse Sensor signal every 2mS
                                    // IF YOU ARE POWERING The Pulse Sensor AT VOLTAGE LESS THAN THE BOARD VOLTAGE,
                                    // UN-COMMENT THE NEXT LINE AND APPLY THAT VOLTAGE TO THE A-REF PIN
                                    //   analogReference(EXTERNAL);
}


//  Where the Magic Happens
void loop()
{
   serialOutput();

  if (QS == true) // A Heartbeat Was Found
    {
      // BPM and IBI have been Determined
      // Quantified Self "QS" true when arduino finds a heartbeat
      serialOutputWhenBeatHappens(); // A Beat Happened, Output that to serial.
      QS = false; // reset the Quantified Self flag for next time
    }

  delay(20); //  take a break
}


void interruptSetup()
{
  // Initializes Timer2 to throw an interrupt every 2mS.
  TCCR2A = 0x02;     // DISABLE PWM ON DIGITAL PINS 3 AND 11, AND GO INTO CTC MODE
  TCCR2B = 0x06;     // DON'T FORCE COMPARE, 256 PRESCALER
  OCR2A = 0X7C;      // SET THE TOP OF THE COUNT TO 124 FOR 500Hz SAMPLE RATE
  TIMSK2 = 0x02;     // ENABLE INTERRUPT ON MATCH BETWEEN TIMER2 AND OCR2A
  sei();             // MAKE SURE GLOBAL INTERRUPTS ARE ENABLED
}

void serialOutput()
{   // Decide How To Output Serial.
 if (serialVisual == true)
  {
     arduinoSerialMonitorVisual('-', Signal);   // goes to function that makes Serial Monitor Visualizer
  }
 else
  {
      sendDataToSerial('S', Signal);     // goes to sendDataToSerial function
   }
}

void serialOutputWhenBeatHappens()
{
 if (serialVisual == true) //  Code to Make the Serial Monitor Visualizer Work
   {
     Serial.print(" Heart-Beat Found ");  //ASCII Art Madness
     Serial.print("BPM: ");
     Serial.println(BPM);
   }
 else
   {
     sendDataToSerial('B',BPM);   // send heart rate with a 'B' prefix
     sendDataToSerial('Q',IBI);   // send time between beats with a 'Q' prefix
   }
}

void arduinoSerialMonitorVisual(char symbol, int data )
{
  const int sensorMin = 0;      // sensor minimum, discovered through experiment
  const int sensorMax = 1024;    // sensor maximum, discovered through experiment
  int sensorReading = data; // map the sensor range to a range of 12 options:
  int range = map(sensorReading, sensorMin, sensorMax, 0, 11);
  // do something different depending on the
  // range value:
}


void sendDataToSerial(char symbol, int data )
{
   Serial.print(symbol);
   Serial.println(data);
}

ISR(TIMER2_COMPA_vect) //triggered when Timer2 counts to 124
{
  cli();                                      // disable interrupts while we do this
  Signal = analogRead(pulsePin);              // read the Pulse Sensor
  sampleCounter += 2;                         // keep track of the time in mS with this variable
  int N = sampleCounter - lastBeatTime;       // monitor the time since the last beat to avoid noise
                                              //  find the peak and trough of the pulse wave
  if(Signal < thresh && N > (IBI/5)*3) // avoid dichrotic noise by waiting 3/5 of last IBI
    {
      if (Signal < T) // T is the trough
      {
        T = Signal; // keep track of lowest point in pulse wave
      }
    }

  if(Signal > thresh && Signal > P)
    {          // thresh condition helps avoid noise
      P = Signal;                             // P is the peak
    }                                        // keep track of highest point in pulse wave

  //  NOW IT'S TIME TO LOOK FOR THE HEART BEAT
  // signal surges up in value every time there is a pulse
  if (N > 250)
  {                                   // avoid high frequency noise
    if ( (Signal > thresh) && (Pulse == false) && (N > (IBI/5)*3) )
      {
        Pulse = true;                               // set the Pulse flag when we think there is a pulse
        digitalWrite(blinkPin,HIGH);                // turn on pin 13 LED
        IBI = sampleCounter - lastBeatTime;         // measure time between beats in mS
        lastBeatTime = sampleCounter;               // keep track of time for next pulse

        if(secondBeat)
        {                        // if this is the second beat, if secondBeat == TRUE
          secondBeat = false;                  // clear secondBeat flag
          for(int i=0; i<=9; i++) // seed the running total to get a realisitic BPM at startup
          {
            rate[i] = IBI;
          }
        }

        if(firstBeat) // if it's the first time we found a beat, if firstBeat == TRUE
        {
          firstBeat = false;                   // clear firstBeat flag
          secondBeat = true;                   // set the second beat flag
          sei();                               // enable interrupts again
          return;                              // IBI value is unreliable so discard it
        }
      // keep a running total of the last 10 IBI values
      word runningTotal = 0;                  // clear the runningTotal variable

      for(int i=0; i<=8; i++)
        {                // shift data in the rate array
          rate[i] = rate[i+1];                  // and drop the oldest IBI value
          runningTotal += rate[i];              // add up the 9 oldest IBI values
        }

      rate[9] = IBI;                          // add the latest IBI to the rate array
      runningTotal += rate[9];                // add the latest IBI to runningTotal
      runningTotal /= 10;                     // average the last 10 IBI values
      BPM = 60000/runningTotal;               // how many beats can fit into a minute? that's BPM!
      QS = true;                              // set Quantified Self flag
      // QS FLAG IS NOT CLEARED INSIDE THIS ISR
    }
  }

  if (Signal < thresh && Pulse == true)
    {   // when the values are going down, the beat is over
      digitalWrite(blinkPin,LOW);            // turn off pin 13 LED
      Pulse = false;                         // reset the Pulse flag so we can do it again
      amp = P - T;                           // get amplitude of the pulse wave
      thresh = amp/2 + T;                    // set thresh at 50% of the amplitude
      P = thresh;                            // reset these for next time
      T = thresh;
    }

  if (N > 2500)
    {                           // if 2.5 seconds go by without a beat
      thresh = 512;                          // set thresh default
      P = 512;                               // set P default
      T = 512;                               // set T default
      lastBeatTime = sampleCounter;          // bring the lastBeatTime up to date
      firstBeat = true;                      // set these to avoid noise
      secondBeat = false;                    // when we get the heartbeat back
    }

  sei();                                   // enable interrupts when youre done!
}// end isr
After uploading the code open serial monitor at 115200 baud rate,
and put your fingure at the heartbeat sensor module.
you will see your heartbeat in BPM.

*For adults 18 and older, a normal resting heart rate is between 60 and 100 beats per minute (bpm), depending on the person’s physical condition and age. For children ages 6 to 15, the normal resting heart rate is between 70 and 100 bpm, according to the AHA
Displaying result in 16×2 LCD Display.
This time I am going to display the readings of heartbeat sensor in 16×2 LCD display ,
The connection of heartbeat sensor with arduino is same ,just you have to connect the 16×2 LCD display to the arduino as the given circuit diagram below.

Code
Upload the following sketch to your Arduino board:
#include <LiquidCrystal.h>

const int rs = 12, en = 11, d4 = 5, d5 = 4, d6 = 3, d7 = 2;
LiquidCrystal lcd(12, 11, 5, 4, 3, 2);

int pulsePin = A0;                 // Pulse Sensor purple wire connected to analog pin A0
int blinkPin = 13;                // pin to blink led at each beat

// Volatile Variables, used in the interrupt service routine!
volatile int BPM;                   // int that holds raw Analog in 0. updated every 2mS
volatile int Signal;                // holds the incoming raw data
volatile int IBI = 600;             // int that holds the time interval between beats! Must be seeded!
volatile boolean Pulse = false;     // "True" when User's live heartbeat is detected. "False" when not a "live beat".
volatile boolean QS = false;        // becomes true when Arduoino finds a beat.

static boolean serialVisual = true;   // Set to 'false' by Default.  Re-set to 'true' to see Arduino Serial Monitor ASCII Visual Pulse

volatile int rate[10];                      // array to hold last ten IBI values
volatile unsigned long sampleCounter = 0;          // used to determine pulse timing
volatile unsigned long lastBeatTime = 0;           // used to find IBI
volatile int P = 512;                      // used to find peak in pulse wave, seeded
volatile int T = 512;                     // used to find trough in pulse wave, seeded
volatile int thresh = 525;                // used to find instant moment of heart beat, seeded
volatile int amp = 100;                   // used to hold amplitude of pulse waveform, seeded
volatile boolean firstBeat = true;        // used to seed rate array so we startup with reasonable BPM
volatile boolean secondBeat = false;      // used to seed rate array so we startup with reasonable BPM

void setup()
{
  pinMode(blinkPin,OUTPUT);         // pin that will blink to your heartbeat!
  Serial.begin(115200);             // we agree to talk fast!
  interruptSetup();                 // sets up to read Pulse Sensor signal every 2mS
                                    // IF YOU ARE POWERING The Pulse Sensor AT VOLTAGE LESS THAN THE BOARD VOLTAGE,
                                    // UN-COMMENT THE NEXT LINE AND APPLY THAT VOLTAGE TO THE A-REF PIN
                                    //   analogReference(EXTERNAL);
 lcd.begin(16, 2);
 lcd.clear();
}


//  Where the Magic Happens
void loop()
{
   serialOutput();

  if (QS == true) // A Heartbeat Was Found
    {
      // BPM and IBI have been Determined
      // Quantified Self "QS" true when arduino finds a heartbeat
      serialOutputWhenBeatHappens(); // A Beat Happened, Output that to serial.
      QS = false; // reset the Quantified Self flag for next time
    }

  delay(20); //  take a break
}


void interruptSetup()
{
  // Initializes Timer2 to throw an interrupt every 2mS.
  TCCR2A = 0x02;     // DISABLE PWM ON DIGITAL PINS 3 AND 11, AND GO INTO CTC MODE
  TCCR2B = 0x06;     // DON'T FORCE COMPARE, 256 PRESCALER
  OCR2A = 0X7C;      // SET THE TOP OF THE COUNT TO 124 FOR 500Hz SAMPLE RATE
  TIMSK2 = 0x02;     // ENABLE INTERRUPT ON MATCH BETWEEN TIMER2 AND OCR2A
  sei();             // MAKE SURE GLOBAL INTERRUPTS ARE ENABLED
}

void serialOutput()
{   // Decide How To Output Serial.
 if (serialVisual == true)
  {
     arduinoSerialMonitorVisual('-', Signal);   // goes to function that makes Serial Monitor Visualizer
  }
 else
  {
      sendDataToSerial('S', Signal);     // goes to sendDataToSerial function
   }
}

void serialOutputWhenBeatHappens()
{
 if (serialVisual == true) //  Code to Make the Serial Monitor Visualizer Work
   {
     Serial.print(" Heart-Beat Found ");  //ASCII Art Madness
     Serial.print("BPM: ");
     Serial.println(BPM);
     lcd.print("Heart-Beat Found ");
     lcd.setCursor(1,1);
     lcd.print("BPM: ");
     lcd.setCursor(5,1);
     lcd.print(BPM);
     delay(300);
     lcd.clear();
   }
 else
   {
     sendDataToSerial('B',BPM);   // send heart rate with a 'B' prefix
     sendDataToSerial('Q',IBI);   // send time between beats with a 'Q' prefix
   }
}

void arduinoSerialMonitorVisual(char symbol, int data )
{
  const int sensorMin = 0;      // sensor minimum, discovered through experiment
  const int sensorMax = 1024;    // sensor maximum, discovered through experiment
  int sensorReading = data; // map the sensor range to a range of 12 options:
  int range = map(sensorReading, sensorMin, sensorMax, 0, 11);
  // do something different depending on the
  // range value:
}


void sendDataToSerial(char symbol, int data )
{
   Serial.print(symbol);
   Serial.println(data);
}

ISR(TIMER2_COMPA_vect) //triggered when Timer2 counts to 124
{
  cli();                                      // disable interrupts while we do this
  Signal = analogRead(pulsePin);              // read the Pulse Sensor
  sampleCounter += 2;                         // keep track of the time in mS with this variable
  int N = sampleCounter - lastBeatTime;       // monitor the time since the last beat to avoid noise
                                              //  find the peak and trough of the pulse wave
  if(Signal < thresh && N > (IBI/5)*3) // avoid dichrotic noise by waiting 3/5 of last IBI
    {
      if (Signal < T) // T is the trough
      {
        T = Signal; // keep track of lowest point in pulse wave
      }
    }

  if(Signal > thresh && Signal > P)
    {          // thresh condition helps avoid noise
      P = Signal;                             // P is the peak
    }                                        // keep track of highest point in pulse wave

  //  NOW IT'S TIME TO LOOK FOR THE HEART BEAT
  // signal surges up in value every time there is a pulse
  if (N > 250)
  {                                   // avoid high frequency noise
    if ( (Signal > thresh) && (Pulse == false) && (N > (IBI/5)*3) )
      {
        Pulse = true;                               // set the Pulse flag when we think there is a pulse
        digitalWrite(blinkPin,HIGH);                // turn on pin 13 LED
        IBI = sampleCounter - lastBeatTime;         // measure time between beats in mS
        lastBeatTime = sampleCounter;               // keep track of time for next pulse

        if(secondBeat)
        {                        // if this is the second beat, if secondBeat == TRUE
          secondBeat = false;                  // clear secondBeat flag
          for(int i=0; i<=9; i++) // seed the running total to get a realisitic BPM at startup
          {
            rate[i] = IBI;
          }
        }

        if(firstBeat) // if it's the first time we found a beat, if firstBeat == TRUE
        {
          firstBeat = false;                   // clear firstBeat flag
          secondBeat = true;                   // set the second beat flag
          sei();                               // enable interrupts again
          return;                              // IBI value is unreliable so discard it
        }
      // keep a running total of the last 10 IBI values
      word runningTotal = 0;                  // clear the runningTotal variable

      for(int i=0; i<=8; i++)
        {                // shift data in the rate array
          rate[i] = rate[i+1];                  // and drop the oldest IBI value
          runningTotal += rate[i];              // add up the 9 oldest IBI values
        }

      rate[9] = IBI;                          // add the latest IBI to the rate array
      runningTotal += rate[9];                // add the latest IBI to runningTotal
      runningTotal /= 10;                     // average the last 10 IBI values
      BPM = 60000/runningTotal;               // how many beats can fit into a minute? that's BPM!
      QS = true;                              // set Quantified Self flag
      // QS FLAG IS NOT CLEARED INSIDE THIS ISR
    }
  }

  if (Signal < thresh && Pulse == true)
    {   // when the values are going down, the beat is over
      digitalWrite(blinkPin,LOW);            // turn off pin 13 LED
      Pulse = false;                         // reset the Pulse flag so we can do it again
      amp = P - T;                           // get amplitude of the pulse wave
      thresh = amp/2 + T;                    // set thresh at 50% of the amplitude
      P = thresh;                            // reset these for next time
      T = thresh;
    }

  if (N > 2500)
    {                           // if 2.5 seconds go by without a beat
      thresh = 512;                          // set thresh default
      P = 512;                               // set P default
      T = 512;                               // set T default
      lastBeatTime = sampleCounter;          // bring the lastBeatTime up to date
      firstBeat = true;                      // set these to avoid noise
      secondBeat = false;                    // when we get the heartbeat back
    }

  sei();                                   // enable interrupts when youre done!
}// end isr
After uploading the code again put your any fingure on heartbeat sensor.


Video demonstration
Watch this quick video demonstration to see this project in action:
I hope you found this post useful.
Share this post with a friend that also likes electronics!


Thank you, for this code and it is working correctly, but can you please share the code for interfacing pulse rate sensor with NodeMCU?
Thank you once again
Okay I will share the code for interfacing pulse rate sensor with NODEMCU.
Thank you, sir can you please share the code for interfacing pulse sensor
Thank you once again
hey can you send code to me too? ryanshrestha0419@gmail.com thank you.
Check Your Mail
it isn’t showing the output
Error while setting serial port parameters: 115,200 N 8 1
what to do now?
Set Correct Baud rate.
we ordered 16×2 display from amazon but not able to hook up the jumper cables on the back. which specific 16×2 display did you use?
First Soldire headers on the back of LCD.
Showing a garbage value
When sensor is not attached …..it is normal to show garbage value.
yes it is normal
Code is good but without giving the data it is showing the output. Can u please give me reply for this.
If the sensor is not attached with any of the fingure, it will gives garbage value …….its normal
Does this code working by writing it directly in the Arduino software or do we have to install some other modules? Please reply as soon as you can.
please share nodemcu code ,thanks alot.
EMAIL:-aftaabjariwala@gmail.co,
Hello sir, may I have the code for Nodemcu ESP32 too?
Can you email me at: unsungtraveller@gmail.com
Ok sure
Hi sir in materials required there is mentioned switch but its not used in this right as it is not used here could you send the code with switch to this mail teritemp2@gmail.com
Hello, Well Done man!!!
Can you please give the code for using TM1637 instead of LCD with the same task (just displaying the BPM only)?
Wow ccuz this iis great work! Congrats and keep it up!
Your tutorial is really amazing, can you please give me this code for ESP32 dev board.
My mail ID is manaaz2111@gmail.com
Yes Sure.
Thank You, It is working so well. can you please send me the code for nodemcu
mail: 10kdreddy@gmail.com
will upload video soon.
sir, can you share the code for interfacing pulse rate sensor with NODEMCU.
thank you.
mail id:- randyrock049@gmail.com
Hello and thank you for sharing this project! May i ask if the Antistatic Bag is needed for the sensor? Can i place something else behind it?
Put anything except metal.
Hey bro… If u dont mind then can i get code for pulse sensor temperature sensor and heart sensor… We have project sir said use 3 sensor along with ur ventilator project… I’m just confused how to merge this all code.. If u dont mind can u help me
To be honest Very very useful projects..nd detailed explanation sir.. thank u so much
Good, can you send code to me too? bammyoc@gmail.com thank you
bro can you send code after installing breadboard,Arduino and jumper wires my email id bhukyayashodhara@gamil.com
OK sure
Could you please send me the code?
ayansheikh252550@gmail.com
:\Users\ROHAN\Music\heartsensor\hearttsensor\hearttsensor.ino: In function ‘void setup()’:
C:\Users\ROHAN\Music\heartsensor\hearttsensor\hearttsensor.ino:26:1: error: a function-definition is not allowed here before ‘{‘ token
{
^
C:\Users\ROHAN\Music\heartsensor\hearttsensor\hearttsensor.ino:38:1: error: a function-definition is not allowed here before ‘{‘ token
{
^
C:\Users\ROHAN\Music\heartsensor\hearttsensor\hearttsensor.ino:54:1: error: a function-definition is not allowed here before ‘{‘ token
{
^
C:\Users\ROHAN\Music\heartsensor\hearttsensor\hearttsensor.ino:64:1: error: a function-definition is not allowed here before ‘{‘ token
{ // Decide How To Output Serial.
^
C:\Users\ROHAN\Music\heartsensor\hearttsensor\hearttsensor.ino:76:1: error: a function-definition is not allowed here before ‘{‘ token
{
^
C:\Users\ROHAN\Music\heartsensor\hearttsensor\hearttsensor.ino:91:1: error: a function-definition is not allowed here before ‘{‘ token
{
^
C:\Users\ROHAN\Music\heartsensor\hearttsensor\hearttsensor.ino:102:1: error: a function-definition is not allowed here before ‘{‘ token
{
^
In file included from C:\Users\ROHAN\AppData\Local\Arduino15\packages\arduino\hardware\avr\1.8.5\cores\arduino/Arduino.h:30:0,
from C:\Users\ROHAN\AppData\Local\Temp\arduino-sketch-33EAFD52DEFD8C3D9199720CED8D6EA8\sketch\hearttsensor.ino.cpp:1:
C:\Users\ROHAN\Music\heartsensor\hearttsensor\hearttsensor.ino:107:1: error: expected unqualified-id before string constant
ISR(TIMER2_COMPA_vect) //triggered when Timer2 counts to 124
^
C:\Users\ROHAN\Music\heartsensor\hearttsensor\hearttsensor.ino:108:1: error: a function-definition is not allowed here before ‘{‘ token
{
^
Compilation error: exit status 1
I could not resist commenting. Well written!
I would like to thank you for the efforts you’ve put in writing this website. I’m hoping to see the same high-grade content from you in the future as well. In truth, your creative writing abilities has inspired me to get my own blog now 😉
This is a topic which is near to my heart… Best wishes! Exactly where are your contact details though?
Excellent web site you have here.. Itís hard to find excellent writing like yours nowadays. I seriously appreciate people like you! Take care!!
I absolutely love your site.. Great colors & theme. Did you build this site yourself? Please reply back as Iím wanting to create my own personal website and would like to learn where you got this from or what the theme is named. Cheers!
You have made some decent points there. I checked on the net for more info about the issue and found most people will go along with your views on this website.
You’re so interesting! I do not suppose I’ve truly read through something like that before. So wonderful to discover somebody with some original thoughts on this subject. Seriously.. many thanks for starting this up. This website is something that is needed on the web, someone with a bit of originality!
Nice post. I learn something new and challenging on sites I stumbleupon everyday. It will always be useful to read through articles from other authors and use something from their websites.
Hi, I do think this is a great site. I stumbledupon it 😉 I will revisit once again since I bookmarked it. Money and freedom is the greatest way to change, may you be rich and continue to guide others.
Aw, this was a really nice post. Spending some time and actual effort to produce a good articleÖ but what can I sayÖ I put things off a lot and never seem to get nearly anything done.
This blog was… how do you say it? Relevant!! Finally I’ve found something that helped me. Thanks a lot!
bookmarked!!, I like your web site!
I used to be able to find good info from your blog posts.
Way cool! Some extremely valid points! I appreciate you penning this article plus the rest of the site is extremely good.
Can u send me the code ..
sultanasayma799@gmail.com
sure
Very good write-up. I definitely appreciate this site. Stick with it!
bookmarked!!, I love your blog!
Top site ,.. amazaing post ! Just keep the work on !
Send me code
Copy from the article.
Your will thanks!
Obtain the results you want with less effort, incredibly simple.
The Amazingness is the excellent way to obtain more out of your life.
Introducing Amazing, the efficiency toolkit that can aid you function smarter as well as live far better.