I have design and Made Purple ESP32 and ESP32 with USB Type- C port….those boards were amazing, Now in this Article I am going to introduce my newly design brand new ESP32C3-MINI board.
If we compare with the regular ESP32 Board with the size of this ESP32C3 MINI BOARD the size is almost half.
Also I have added USB type-C Port, So this ESP32-C3-MINI is compact and easy to use, which make it an ideal choice for IoT developers and hobbyists.
It features a compact form factor and can be easily integrated into a wide range of projects.
It also comes with a variety of development tools and resources, including an integrated development environment (IDE), software libraries, and example code.
PCB Design.
This is the Schematic of PCBs. If you want Your own custom designed PCBs, Then you can download this schematic.
After making the Schematic, Convert it into PCB, Arrange and place all the components in desirable places, Once the layout is ready route the wiring and complete the design of PCB.
After The completion of PCB design, You need to download three files which will required during PCB order. These files are BOM, Gerber and CPL that is pick and place file.
Ordering the PCBs at JLCPCB.
This project is sponsored by JLCPCB. JLCPCB is a full feature Printed Circuit Board manufacturing service.
Turn your DIY breadboard circuits into professional PCBs– get 10 boards for approximately $5 + shipping (which will vary depending on your country).
Once you have your Gerber files, you can order the PCB. Follow the next steps.
2. Go to JLCPCB website and Click on Quote Now button.
3.Upload the Gerber file you downloaded in the last step. Upload the.zip file or you can also drag and drop the Gerber files.
After uploading the zip file, you’ll see a success message at the bottom if the file is successfully uploaded. You can review the PCB in the Gerber viewer to make sure everything is good.
JLCPCB can grab all the PCB details and automatically fills them for you.
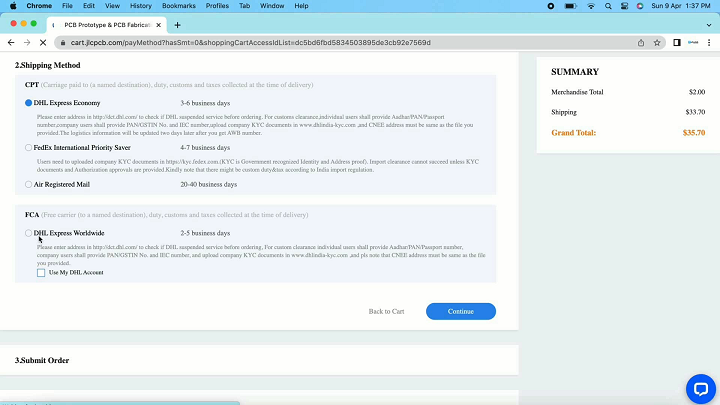
Select the PCB quantity and color masking of PCB by your self. I am selecting black color. After that Click on Save to cart to complete your order. And here if you select the fastest shipping option you may get the PCBs delivered at your desired location within a week.
After seven days, PCBs arrived at my place. As usual the quality of PCB is very premium, and the Components are soldered very well. Traces are perfect, silkscreen is fine, Green color PCB masking looks very beautiful and PCBs look pretty professional.
Do try Ordering the PCBs for your next projects from the JLCPCB & not only that, JLCPCB also provides the PCB Assembly services and the 3D Printing services.
Features and Specifications.
ESP32-C3-MINI: A Powerful and Compact IoT Development Board.
The ESP32-C3-MINI is a powerful and compact IoT development board based on the ESP32-C3 microcontroller. Developed by Espressif Systems, the ESP32-C3-MINI is designed for a wide range of IoT applications, including smart homes, wearables, and industrial automation. In this article, we’ll take a closer look at the features and capabilities of this exciting development board.
Powerful Processing Capabilities.
At the heart of the ESP32-C3-MINI is the ESP32-C3 microcontroller, which is based on the Xtensa LX7 core. With a clock speed of up to 160 MHz, this powerful processor is capable of handling complex tasks and applications. It also features 400 KB of SRAM and 384 KB of ROM, providing ample space for code and data storage.
Built-in Wi-Fi and Bluetooth.
The ESP32-C3-MINI features built-in Wi-Fi and Bluetooth connectivity, allowing it to easily connect to the internet and other devices. It supports 802.11b/g/n Wi-Fi standards, as well as Bluetooth 5.0. This makes it ideal for a wide range of IoT applications, such as smart home devices, wearables, and industrial automation.
Low Power Consumption
One of the key advantages of the ESP32-C3-MINI is its low power consumption. It features advanced power management features that allow it to operate for extended periods of time on a single battery charge. This makes it ideal for IoT applications where power efficiency is critical, such as in wearables and remote sensors.
Compact and Easy to Use.
The ESP32-C3-MINI is designed to be compact and easy to use, making it an ideal choice for IoT developers and hobbyists. It features a compact form factor and can be easily integrated into a wide range of projects. It also comes with a variety of development tools and resources, including an integrated development environment (IDE), software libraries, and example code.
Versatile and Customizable.
The ESP32-C3-MINI is a versatile and customizable development board that can be used for a wide range of IoT applications. It comes with a variety of input/output (I/O) pins, allowing it to be easily connected to a variety of sensors, actuators, and other devices. It also supports a variety of communication protocols, including SPI, I2C, and UART, making it easy to interface with other devices.
Conclusion.
The ESP32-C3-MINI is a powerful and versatile IoT development board that offers a wide range of features and capabilities. With its powerful processor, built-in WiFi and Bluetooth, low power consumption, and compact form factor, it’s an ideal choice for a wide range of IoT applications. Whether you’re a hobbyist or a professional developer, the ESP32-C3-MINI offers a great platform for exploring the possibilities of IoT.
Board Testing.
Now I am going test this ESP32 board by uploading some example codes.
For connecting this ESP32 board with your computer use any of the USB Type-C cable except that the one which is only used for charging.
You can use any of your smartphone USB Type-C cable. Here I am using my smart phone USB data cable for connecting to my computer.
First of all I am going to upload this simple blink sketch.
Here built-in led which is connected to GPIO 2 , will blink in interval of one second.
Now select the right board and the right com port. And the board is ESP32 dev module.
After that click on upload button and see if the code will upload or not.
Code is successfully uploaded in the ESP32 board. Which means this ESP32 board is working fine.
As you can see the onboard led is blinking in every one second. Which is connected to the GPIO pin 2.
BLE test code.
Now I am going to upload this code into ESP32C3 mini board , In this code we will turn on and turn off onboard led through BLE.
Here whenever we get the string 1 it will turn on the onboard led and apart from 1 if we get any value it will turn off onboard led.
Let’s quickly upload this code and will see if BLE is working or not. Code is successfully uploaded that is great.
Now we need this BLE App Called lightblue ..for sending string via BLE .
This app is available on play store as well as on the App Store.
Here you see all the BLE devices near you, the Name of ESP32C3 mini board is LED CONTROL.
Tap on heart rate measurement and select the data format to UTF8 STRING.
As soon as we send the string “1” the onboard LED on the ESP32C3 MINI will turned OFF.
And if we send the string other than “1” onboard LED will Turned OFF.